The HTML <map> tag defines an image map. An image map is an image with clickable areas. The areas are defined with one or more <area> tags.
Try to click on the computer, phone, or the cup of coffee in the image below:
<!DOCTYPE html>
<html>
<head>
<title>Image Maps</title>
</head>
<body>
<h2>Image Maps</h2>
<p>Click on the computer, the phone, or the cup of coffee to go to a new page and read more about the topic:</p>
<img src="/images/laptop.jpg" alt="Laptop" usemap="#laptopmap" width="400" height="379">
<map name="laptopmap">
<area shape="rect" coords="34,44,270,350" alt="Computer Lab" href="/html/computer.htm">
<area shape="rect" coords="290,172,333,250" alt="Phone" href="/html/phone.htm">
<area shape="circle" coords="337,300,44" alt="Cup of coffee" href="/html/coffee.htm">
</map>
</body>
</html>
Output
How Does it Work?
The idea behind an image map is that you should be able to perform different actions depending on where in the image you click.
To create an image map you need an image, and some HTML code that describes the clickable areas.
The Image
The image is inserted using the <img> tag. The only difference from other images is that you must add a usemap attribute:
<img src="laptop.jpg" usemap="#laptopmap">
The usemap value starts with a hash tag # followed by the name of the image map, and is used to create a relationship between the image and the image map.
Tip: You can use any image as an image map!
Create Image Map
Then, add a <map> element.
The <map> element is used to create an image map, and is linked to the image by using the required name attribute:
<map name="laptopmap">
The name attribute must have the same value as the <img>'s usemap attribute .
The Areas
Then, add the clickable areas.
A clickable area is defined using an <area> element.
Shape
You must define the shape of the clickable area, and you can choose one of these values:
rect- defines a rectangular regioncircle- defines a circular regionpoly- defines a polygonal regiondefault- defines the entire region
You must also define some coordinates to be able to place the clickable area onto the image.
Shape="rect"
The coordinates for shape="rect" come in pairs, one for the x-axis and one for the y-axis.
So, the coordinates 34,44 is located 34 pixels from the left margin and 44 pixels from the top:
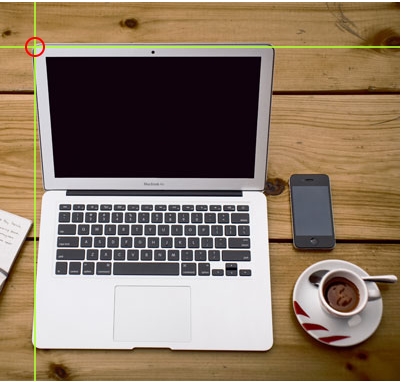
The coordinates 270,350 is located 270 pixels from the left margin and 350 pixels from the top:

Now we have enough data to create a clickable rectangular area:
Example
<area shape="rect" coords="34, 44, 270, 350" href="computer_lab.htm">
This is the area that becomes clickable and will send the user to the page "computer.htm":

Shape="circle"
To add a circle area, first locate the coordinates of the center of the circle:
337,300

Then specify the radius of the circle:
44 pixels

Now you have enough data to create a clickable circular area:
Example
<area shape="circle" coords="337, 300, 44" href="coffee.htm">
This is the area that becomes clickable and will send the user to the page "coffee.htm":