HTML ਲਿੰਕਸ ਨੂੰ ਹਾਈਪਰਲਿੰਕਸ ਕਿਹਾ ਜਾਂਦਾ ਹੈ। ਇੱਕ ਵੈੱਬਪੇਜ ਵਿੱਚ ਵੱਖ-ਵੱਖ ਲਿੰਕ ਸ਼ਾਮਲ ਹੋ ਸਕਦੇ ਹਨ। ਇਹਨਾਂ ਲਿੰਕਸ ਉਪਰ ਕਲਿਕ ਕਰਕੇ ਯੂਜ਼ਰ ਏਕ ਵੈੱਬ ਪੇਜ਼/ਸਾਈਟ ਤੋਂ ਦੂਜੇ ਪੇਜ਼/ਸਾਈਟ ਉਪਰ ਜਾ ਸਕਦੇ ਹਨ। ਮੂਲ ਰੂਪ ਵਿੱਚ ਲਿੰਕਸ ਨੂੰ ਵੈੱਬ ਬ੍ਰਾਊਜ਼ਰ ਦੁਆਰਾ ਨੀਲੇ ਰੰਗ ਵਿੱਚ ਅੰਡਰਲਾਈਨ ਕਰਕੇ ਦਿਖਾਇਆ ਜਾਂਦਾ ਹੈ। HTML ਵਿੱਚ <a> ਟੈਗ ਦੀ ਵਰਤੋਂ ਕਰਕੇ ਇੱਕ ਲਿੰਕ ਬਣਾਇਆ ਜਾ ਸਕਦਾ ਹੈ। ਇਸ ਟੈਗ ਨੂੰ ਐਂਕਰ ਟੈਗ ਕਿਹਾ ਜਾਂਦਾ ਹੈ। ਇਸ ਟੈਗ ਵਿੱਚ HREF ਐਟਰੀਬਿਊਟ ਦੀ ਮਦਦ ਨਾਲ ਹਾਈਪਰਲਿੰਕ ਕੀਤੇ ਜਾਣ ਵਾਲੇ ਡਾਕੂਮੈਂਟ ਦਾ URL ਸੈੱਟ ਕੀਤਾ ਜਾਂਦਾ ਹੈ। ਐਂਕਰ ਟੈਗ ਦੀ ਵਰਤੋਂ ਨਾਲ ਹਾਈਪਰਲਿੰਕ ਬਣਾਉਣ ਲਈ ਹੇਠਾਂ ਦਿਤੇ ਮੁਢਲੇ syntax ਦੀ ਵਰਤੋਂ ਕੀਤੀ ਜਾ ਸਕਦੀ ਹੈ।
<a href="url">link text or Image</a>
HREF ਐਟਰੀਬਿਊਟਸ ਐਂਕਰ ਟੈਗ ਦਾ ਜਰੂਰੀ ਐਟਰੀਬਿਊਟ ਹੈ ਜੋ ਲਿੰਕ ਕੀਤੇ ਜਾਣ ਵਾਲੇ ਡਾਕੂਮੈਂਟ ਜਾਂ ਸਰੋਤ ਦੇ ਐਡਰੈਸ ਨੂੰ ਸੈੱਟ ਕਰਨ ਲਈ ਵਰਤਿਆ ਜਾਂਦਾ ਹੈ। HREF ਐਟਰੀਬਿਊਟ ਤੋਂ ਬਿਨਾਂ ਐਂਕਰ ਟੈਗ ਦਾ ਕੋਈ ਵਜੂਦ ਨਹੀਂ ਹੈ ਰਹਿੰਗਾ।
HTML links are hyperlinks.
You can click on a link and jump to another document.
When you move the mouse over a link, the mouse arrow will turn into a little hand.
Note: A link does not have to be text. A link can be an image or any other HTML element!
HTML Links - Syntax
The HTML <a> tag defines a hyperlink. It has the following syntax:
<a href="url">link text or Image</a>
The most important attribute of the <a> element is the href attribute, which indicates the link's destination.
The link text is the part that will be visible to the reader.
Clicking on the link text, will send the reader to the specified URL address.
Example
This example shows how to create a link to W3Schools.com:
<a href="http://gssskhokhar.com/">Visit gssskhokhar.com!</a>
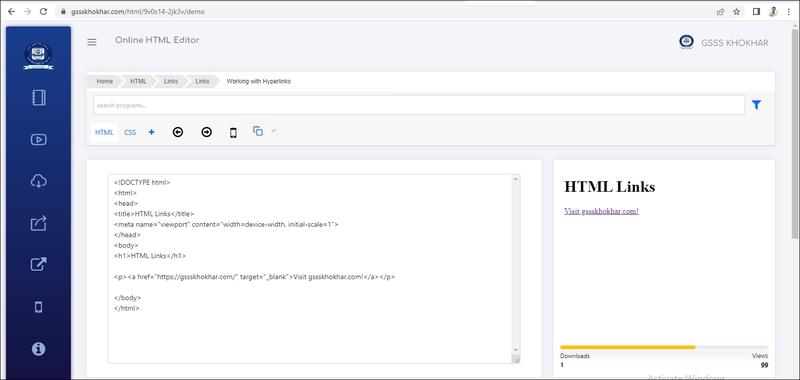
<!DOCTYPE html>
<html>
<head>
<title>HTML Links</title>
<meta name="viewport" content="width=device-width, initial-scale=1">
</head>
<body>
<h1>HTML Links</h1>
<p><a href="https://gssskhokhar.com/" target="_blank">Visit gssskhokhar.com!</a></p>
</body>
</html>
Output
ਵੈੱਬ ਪੇਜਾਂ ਵਿਚ ਇਕ ਹਾਈਪਰਲਿੰਕਸ ਦੀਆਂ ਵੱਖ-ਵੱਖ ਸਟੇਟਸ (States) ਹੁੰਦੀਆਂ ਹਨ। ਲਿੰਕ ਦੀਆਂ ਕੁਝ ਆਮ ਸਟੇਟਸ ਅਤੇ ਵੈੱਬ ਬ੍ਰਾਊਜ਼ਰਸ ਵਿਚ ਉਹਨਾਂ ਦੀ ਡਿਫਾਲਟ ਦਿੱਖ ਹੇਠ ਲਿਖੇ ਅਨੁਸਾਰ ਹੁੰਦੀ ਹੈ।
1) ਅਨਵਿਜ਼ਿਟਡ ਲਿੰਕਸ (Unvisited Links) : ਇਹ ਉਹ ਸਾਰੇ ਲਿੰਕ ਹੁੰਦੇ ਹਨ ਜਿਹਨਾਂ ਉਪਰ ਯੂਜ਼ਰ ਵੱਲੋ ਅਜੇ ਕਲਿੱਕ ਨਹੀਂ ਕੀਤਾ ਗਿਆ ਹੁੰਦਾ। ਮੂਲ ਰੂਪ ਵਿੱਚ (By default) ਇੱਕ ਅਨਵਿਜ਼ਿਟਡ ਲਿੰਕ ਅੰਡਰਲਾਈਨ ਹੁੰਦਾ ਹੈ ਅਤੇ ਨੀਲੇ (blue) ਰੰਗ ਵਿੱਚ ਦਿਖਾਇਆ ਜਾਂਦਾ ਹੈ।
2) ਵਿਜ਼ਿਟਡ ਲਿੰਕਸ (Visited Links) : ਇਹ ਉਹ ਲਿੰਕ ਹੁੰਦੇ ਹਨ ਜਿਹਨਾਂ ਉੱਪਰ ਯੂਜਰ ਪਹਿਲਾ ਹੀ ਕਲਿੱਕ ਕਰਕੇ ਉਹਨਾਂ ਨੂੰ ਓਪਨ ਕਰ ਚੁਕਿਆ ਹੁੰਦਾ ਹੈ। ਮੂਲ ਰੂਪ ਵਿੱਚ (by default) ਇੱਕ ਵਿਜ਼ਿਟਡ ਲਿੰਕ ਅੰਡਰਲਾਈਨ ਹੁੰਦਾ ਹੈ ਅਤੇ ਜਾਮਨੀ (purple) ਰੰਗ ਵਿੱਚ ਦਿਖਾਇਆ ਜਾਂਦਾ ਹੈ।
3) ਐਕਟਿਵ ਲਿੰਕਸ (Active Links) : ਇਹ ਲਿੰਕ ਉਹ ਸਟੇਟ ਹੁੰਦੀ ਹੈ ਜਦੋਂ ਯੂਜ਼ਰ ਇੱਕ ਅਨਵਿਜ਼ਿਟਡ ਲਿੰਕ ਉਪਰ ਕਲਿੱਕ ਕਰਦਾ ਹੈ। ਮੂਲ ਰੂਪ ਵਿੱਚ (by default) ਇੱਕ ਐਕਟਿਵ ਲਿੰਕ ਅੰਡਰਲਾਈਨ ਹੁੰਦਾ ਹੈ ਅਤੇ ਲਾਲ (red) ਰੰਗ ਵਿਚ ਦਿਖਾਇਆ ਜਾਂਦਾ ਹੈ।
By default, links will appear as follows in all browsers:
1) An unvisited link is underlined and blue
2) A visited link is underlined and purple
3) An active link is underlined and red
Tip: Links can of course be styled with CSS, to get another look!
- Use the
<a>element to define a link - Use the
hrefattribute to define the link address - Use the
targetattribute to define where to open the linked document - Use the
<img>element (inside<a>) to use an image as a link - Use the
mailto:scheme inside thehrefattribute to create a link that opens the user's email program
